Edição de fotos não é algo muito complicado de se fazer. Aparentemente…
É importante você não perder a mão neste momento e acabar exagerando na dose.
A real intenção da edição é ajudar a imagem a chegar mais perto do que você realmente queria mostrar.
O que é possível com edição? Corrigir pequenos problemas, organizar a luz, acalmar a cor, melhorar o corte e dar mais presença pro assunto.
E o que não é possível editar? Foto tremida demais, foto fora de foco ou feita em luz muito ruim.
Comece pelo corte
Antes de mexer na cor, no contraste ou no filtro, olhe o enquadramento.
De repente a foto vai melhorar só com um corte, também conhecido como crop.
Situações onde um crop pode te ajudar: tirar aquele pedaço sobrando no canto, uma pessoa aparecendo pela metade, um teto vazio demais, uma lixeira chamando atenção, um horizonte torto.
Cortar é editar a leitura da imagem, não é só aproximar.
Evite cortar demais, pois acabar diminuíndo bastante a qualidade, principalmente em foto de celular ou arquivo pequeno.
Se precisar cortar muito, talvez o problema tenha começado ao pressionar o dedo no botão.
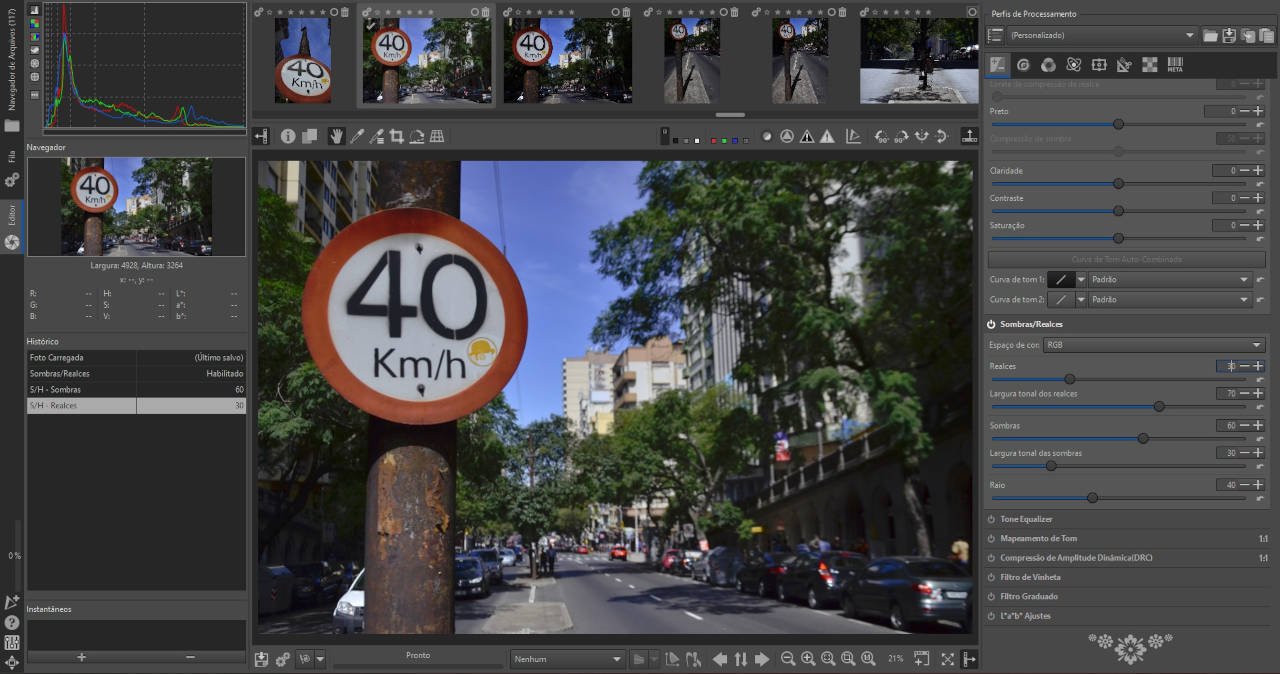
Exposição vem antes do efeito
Geralmente a exposição é um dos primeiros ajustes a serem feitos.
Se a foto tá escura demais, aumentar exposição.
Se tá clara demais, talvez seja melhor segurar as altas luzes antes que tudo fique estourado.
Como quase tudo em fotografia, há excessões.
Nem toda sombra precisa ser recuperada e nem toda área clara precisa virar cinza.
Às vezes a sombra faz parte da foto e às vezes o contraste é justamente o que dá força.
Quando a edição tenta salvar absolutamente tudo da imagem, o resultado pode ficar meio (ou muito) artificial.
Contraste dá presença, mas cobra
Contrastar vai ajudar a foto a ganhar força na sua aparência.
Ele vai separar melhor luz e sombra, vai dar volume e vai evitar sensação de imagem desbotada, sem vida.
Em fotografia de rua, paisagem, produto e retrato, um pouco de contraste pode fazer bastante diferença.
Mas, exagerar no contraste vai acabar deixando a foto com sensação de foto dura.
Contrastar acima do necessário tende a deixar a foto ficar mais dramática, mas nem sempre pode acabar sendo o melhor encaminhamento.
Cor precisa de calma
Ao ajuste de cor pode ser uma armadilha, é uma das partes onde a edição mais se perde.
Saturar demais vai deixar o céu, a pele, a grama e a comida com cara estranha.
Temperatura também muda bastante, tipo, uma foto pode acabar ficando fria demais, azulada demais, ou quente demais, com aquele amarelão que parece lâmpada ruim.
Nitidez não salva foto ruim
Ajustar nitidez pode ajudar quando a imagem tá um pouco suave.
Mas a nitidez não vai trazer foto fora de foco pra foto nítida de verdade.
Quando tu exagerar neste ajuste, vai aparecer um contorno duro.
No celular é comum, porque o próprio aparelho já aplica o processamento.
Se tu já pega uma foto muito tratada, menos é mais.
Nitidez entra só pra finalizar.
Filtro pronto pode ajudar, mas não manda
Preset e filtro são atalhos pra facilitar o trabalho de edição.
Acabam sendo úteis pra criar uma linguagem visual do fotógrafo, acelerar o trabalho ou dar uma direção inicial pra edição.
O problema é usar o mesmo filtro em qualquer foto, como se toda imagem pedisse a mesma receita.
Por exemplo, uma foto feita em luz dura não vai reagir igual a uma foto em dia nublado.
No celular, menos toque desesperado
Editar no celular tá cada vez mais prático. O fotógrafo conta com uma diversaidade de apps de edição: Lightroom, Snapseed, Google Fotos, Fotos do iPhone e outros aplicativos que resolvem bastante coisa.
Dá pra ajustar exposição, contraste, cor, corte e nitidez de forma fácil e rápida. Com essa facilidade não é raro acabar exagerando na edição. Editar bem no celular é saber parar.
Compare antes e depois
Uma dica pra evitar exageros na edição é olhar a foto como era antes da edição.
Isso é interessante porque durante a edição, o olho vai se acostumando com o exagero.
Aquilo que parecia forte demais começa a parecer normal.
Comparar antes e depois ajuda a perceber se a foto melhorou ou só acabou ficando mais carregada.
Outra opção é deixar a imagem de canto um pouco, quando você retoma o trabalho, o exagero pode ficar evidente.
A boa edição de fotos respeita a foto
Editar é um processo comum na fotografia atual.
Não tem problema ajustar, corrigir ou o fotógrafo buscar uma linguagem própria.
É importante lembrar que a edição não substitui o olhar, a luz e a composição.
Antes de finalizar, avalie se a imagem ficou melhor ou só ficou mais editada?
A boa edição de fotografia costuma melhorar a foto e não destruir o que ela já tinha de bom.